October 5, 2023
With the release of Overwatch 2, Activision Blizzard introduced a new support hero called Kiriko. This mobile hero rose to one of the best supports, perfectly fitting into the game’s current meta and 5v5 model. Kiriko synergizes with almost every team. Further, she excels at keeping her allies alive, making proactive plays, and surviving the high-pressure supports faced in Overwatch’s sequel.
Kiriko has a massive impact on your Overwatch games once you have mastered her kunai and abilities. This guide is a comprehensive dive into Kiriko’s high-skill ceiling that will deliver everything you need to know to unleash your fox power!
Overview
This is a long guide, so I’ll first give you an overview of the topics we cover.
First, we’ll look at Kiriko’s abilities, their detailed mechanics, and when to use them effectively. They’ll be graphics and in-game examples illustrating intricate mechanics.
- Passive: Wall Climb
- Primary fire: Healing Ofuda
- Secondary fire: Kunai
- LShift: Swift Step
- E: Protection Suzu
- Ultimate: Kitsune Rush
Then, we’ll cover Kiriko’s key binds, her responsibilities as a support, and when you should deal damage instead of healing.
Abilities

Source: Activision Blizzard
Let’s jump into Kiriko’s kit and how to use it effectively. As a support, she automatically heals over time. But Kiriko has another passive, called Wall Climb.
1. Passive: Wall Climb
Jump at walls to climb up them.
Although this description sounds straightforward, there are a few things to keep in mind about Kiriko’s passive. That’s also why veteran Overwatch players tend to struggle with Kiriko’s wall climb more than with Genshi’s and Hanzo’s. First, with Kiriko, you need to hold space to climb continuously. Simply pressing space in front of a wall will only give you a short burst of climbing. Even when holding space, Kiriko will not climb indefinitely. Second, you cannot perform a wall climb when facing a wall with your back. Kiriko only climbs walls if you face them upfront.
Now let’s look at how you can use Kiriko’s passive to her advantage.
- Climb over boxes and terrain to traverse the map more effectively and reach your allies or enemies faster.
- Climb on top of buildings, bridges, and ledges to proactively put yourself in an advantageous position.
- Find yourself in a precarious 1v1 or team fight? Climb up walls and objects to confuse your opponents. This is also useful when contesting an objective as the last survivor of your team.
- Repeatedly climb up and drop down an object to peak over it and deal damage. This mechanic has a higher skill ceiling but can result in great poke damage and early picks for your team.
2. Primary Fire: Healing Ofuda
Channel a burst of healing talismans that can seek targeted allies.
Kiriko’s primary fire is her only source of healing. Healing 130 HP every 1.5 seconds, it’s powerful enough to keep your allies alive in most situations. Here is what you need to know.
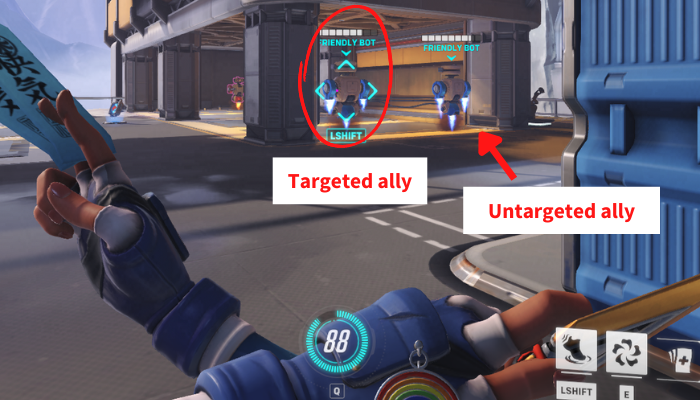
You don’t need to precisely aim at a teammate to heal them. The talismans will find your teammate as long as you have targeted them while casting. To target an ally, look towards them until a blue rectangle appears on them.

You can’t heal allies that are behind walls. You can, however, cast your heal when an ally is in sight and then take cover behind a corner. The healing talismans will travel around corners and make it to your target.
The longer you are away from your targeted teammate, the longer it takes for your talismans to reach their target. This makes Kiriko great for healing at close range. However, sometimes it is wiser to gain distance from your allies to protect yourself from enemy pushes and sightlines. The maximum range of her talismans is 35 meters.
Kiriko’s heal has five charges/talismans, which by default are all consumed when pressing your primary fire button once. Afterward, it takes a short moment until your charges have reloaded automatically. You might be inclined to spam your primary fire when healing. However, this doesn’t increase Kiriko’s healing speed but cancels the consumption of healing charges. Instead, be patient with your mouse inputs and get to know the reload timing to maximize healing over time.
3. Secondary Fire: Kunai
Thrown projectile that deals increased critical damage.
Let’s now dive into the mechanics behind Kiriko’s kunai. Kiriko throws one kunai per shot. You can tap secondary fire to perform a one-shot or hold it to perform a sequence of kunai throws until all 15 are consumed. Then, Kiriko will have to reload. The reload animation can be canceled by, for example, healing with your primary fire.
What does increased critical damage mean? Critical damage refers to damage dealt when hitting a headshot. For example, when a kunai hits an enemy’s body, it deals 40 damage in HP. This means you need to hit five body shots to eliminate an opponent with 200 HP. In contrast, a single headshot by Kiriko’s kunai inflicts 120 damage. In that case, it only takes two headshots to eliminate a 200 HP target. Consequently, Kiriko charges her ultimate quicker when hitting headshots.
Aiming with Kiriko is equally challenging and rewarding. As a projectile hero, Kiriko’s kunai don’t instantaneously hit their target. Instead, they first need to traverse the distance between you and your opponent. Although her kunai travel quickly, this mechanic adds difficulty to hitting enemies from afar. To perform successful attacks, you must consider the projectile speed and anticipate your target’s movement. The more you practice, the better you’ll get! Thankfully, Kiriko’s kunai take a straight projectile path, so you don’t need to account for a bullet drop over large distances. Another plus is that her kunai don’t have any bullet spread.
Finally, Kirko’s kunai damage remains the same regardless of your distance from your target.
4. LShift: Swift Step
Teleport directly to an ally.
Kiriko’s Swift Step is a bit like Mercy’s Guardian Angel. However, it’s stronger and comes with a seven-second cooldown. In addition, the teleport can only be cast when targeting a teammate, similar to Kiriko’s healing mechanic.
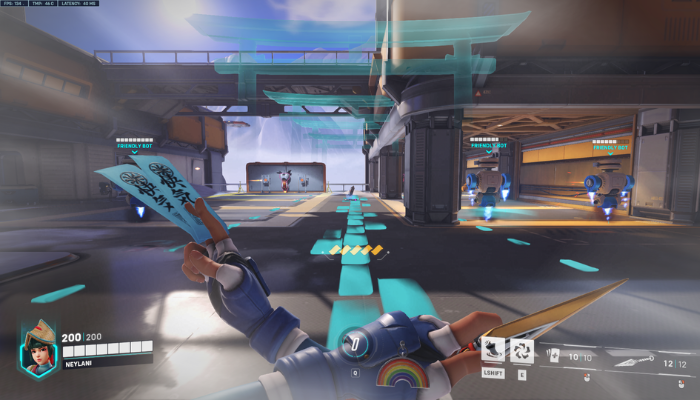
Rather than flying towards your ally, Kiriko’s Swift Step is a teleport with a low cast time. You’re also invulnerable while teleporting. The cast time doesn’t increase when you’re further away from an ally. However, Swift Step has a maximum range of 30 to 35 meters, according to different resources. To illustrate the max range, I’ve added an example from the practice range.

Another perk of Swift Step is that it works through walls. Supports can already see their teammates through multiple layers of walls, and with Kiriko, you can now target one and directly teleport to them. Since Overwatch’s Season 2 update, Swift Step’s ability input can be held to activate. This is a convenient quality of life change.
Where do you end up after teleporting? The answer may seem obvious, but your exact position after teleporting depends on your angle toward your ally. Let’s say you’re facing your ally’s back when casting. Then, you’ll also teleport behind them. If you instead face their front, you’ll end up in front of them, and so on. Keeping this in mind helps you choose your Swift Step target and timing, as you don’t want to end up in a dangerous position.
Next, let’s look at some of the uses of Swift Step.
- Is a flanker pressuring you? Throw them off by teleporting to a faraway teammate.
- Catch up with your team more quickly after respawning.
- Dodge deadly enemy attacks, such as Reinhardt’s Charge and Junkrat’s Rip-Tire, by teleporting away at the right moment.
- Teleport to an ally you can’t otherwise reach with your Healing Ofuda. Depending on your teammate’s position and the aggression they face, this can be a dangerous move. So, use this tactic wisely and always account for your own survivability.
- Disengage a team fight more quickly by teleporting to an ally further away from the enemy. This helps you survive lost team fights and regroup with your team faster. You can also use this tactic when you anticipate lots of incoming damage, for example, after a Baptiste ultimate or enemy dive.
- Make proactive and aggressive plays and teleport to safety before the enemy can punish you
Sadly, Swift Step can’t get you out of any situation. When stunned by, for example, Junkrat’s Steel Trap, Kiriko’s Swift Step is disabled. The same applies to being caught in Zarya’s Graviton Surge.
5. E: Protection Suzu
Throw a protective charm to make allies become briefly invulnerable and cleansed of most negative effects.
Mastering Kiriko’s suzu will yield incredible results for your team. It is a projectile that travels wherever you aim. Upon impact on terrain or an ally, it will apply to teammates within five meters. This means that you can protect several teammates that are close together. The suzu’s area of effect is three-dimensional, meaning that it protects allies at different heights.

While under the protection of your suzu, allies receive 50 healing, don’t take damage, and are cleansed of many negative effects. These include:
- Ana’s Biotic Grenade
- Ana’s Sleep Dart
- Ashe’s Dynamite
- Torbjorn’s Molten Core (It will only cleanse the burning effect and not the lava itself. If allies remain in the lava once the suzu runs out, the burning effect will reapply.)
- Mei’s freezing effect
- Roadhog’s stun when hooked (Your ally will still be pulled towards Roadhog, but they’ll be able to fire and use escape abilities.)
- The knockdown caused by Reinhardt’s Earthshatter
- Zenyatta’s Discord Orb
- Bleeding caused by Junker Queen’s attacks
Lasting only one second with a cooldown of 14 seconds, the timing of your suzu is crucial.
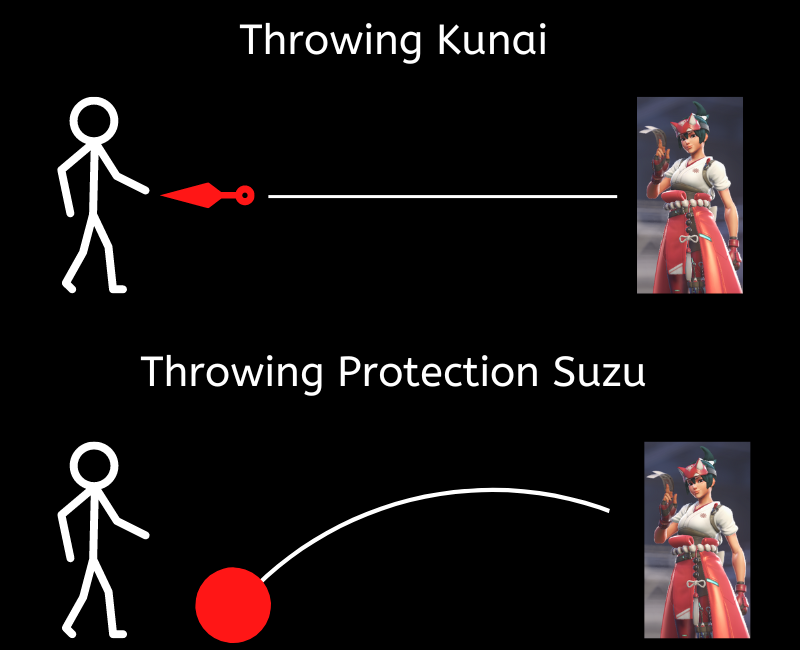
In theory, Kiriko’s suzu doesn’t have a maximum range. However, the projectile travels more slowly than her kunai and in an arch motion. So, the further you’re away from a teammate, the higher you have to aim your suzu. Otherwise, it will splash on the ground too early. I made this beautiful graphic to illustrate what I mean:

Moreover, you need to consider the travel and cast time of the suzu. The latter is 0.1 seconds. Yes, the suzu should be used sparingly but don’t wait too long before casting it, or your allies might die.
Here are some scenarios where the suzu can come in handy!
Throw the suzu on terrain nearby to protect yourself from incoming deadly damage.
- The enemy D.VA is using her ultimate, and you/a teammate can’t hide in time? Safe yourself/your ally with your suzu.
- Safe low-HP teammates from dying by applying your suzu.
- Grant allies more survivability when they’re stunned, frozen, slowed, or trapped.
- Cleanse negative effects on yourself or others that risk your survival.
Which negative effects should I cleanse? This is a nuanced topic that depends on who is affected by a negative effect, the situation, and the type of negative effect. Generally speaking, you want to take note of the possible incoming negative effects in your games. The enemy composition is revealed on the scoreboard 15 seconds after the start of a match. Then, you can check out which heroes can threaten your team with their negative effects.
Additionally, rank the effects based on their severity. For example, Zenyatta’s Discord Orb is less severe than Ana’s Biotic Grenade. This information gives you a helpful guideline, but it isn’t foolproof. For instance, you don’t need to cleanse an ally hit by Ana’s grenade if they’re well protected behind cover until the grenade’s effect expires automatically.
6. Ultimate: Kitsune Rush
Summon a fox spirit that rushes forward, accelerating the movement, attack speed, and cooldowns of allies that follow its path.
The Kitsune Rush can turn around almost every team fight. Therefore, it charges relatively slowly. The ability’s description can be misleading, so here’s everything you need to know! Using her ultimate, Kiriko unleashes a kitsune that runs forward in a straight line and leaves a trail buffing Kiriko and her team. This trail represents the ultimate’s area of effect. It is 25 meters long and lasts 10.5 seconds.

These are the buffs it provides:
- +30% move speed
- +25% rate of fire
- -50% reload time
- 2x faster cooldown regeneration for abilities
The increased rate of fire results in higher damage output for your damage dealers and more healing for yourself and some of your fellow supports. Ana and Baptiste can take advantage of this perk.
On top of that, Kiriko’s ultimate synergizes well with Lucio because the speed boost he provides and that of the Kitsune Rush do indeed stack. This makes for a super-speedy and deadly push combo!
The area of effect’s mechanics involved with Kiriko’s ultimate allows you to be lenient with its placement. In fact, players can leave the ultimate’s area of effect and enjoy the buffs it provides for roughly 1.5 seconds. Then, they will have to step back into the fox’s trail.
You must also be mindful of certain obstacles when placing Kiriko’s ultimate. The kitsune can pass through players and walls. Nevertheless, some abilities, such as Mei’s Wall and Cryo-Freeze, stop the kitsune’s rush.
When should you use such a powerful ultimate? Let’s find out!
- The best way of unleashing the Kitsune Rush is to engage in a team fight. You can do so on offense and defense.
- To mitigate a small number’s disadvantage after an ally has already died. But save your ultimate if your tank is down or if the number’s disadvantage is more than two. Deciding whether a number’s disadvantage can be compensated requires experience and situational awareness. If you’re uncertain about your ultimate’s effectiveness when one player is down, save it for the next team fight.
- You feel like you can win an ongoing team fight, but a teammate is low on HP, and your suzu is on cooldown? Use your ultimate for faster healing.
- Use the Kitsune Rush as a last resort when you’re about to lose the game. Sometimes, you’re running out of time and can’t afford to save your ultimate.
- Don’t use your ultimate if you can’t ensure your survival while casting it. If you’re killed while casting, you’re ultimate will be lost.
Adjust Key Binds to Your Preference
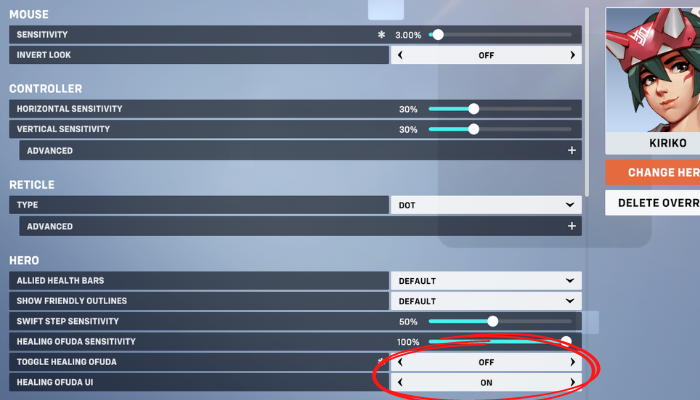
You can have more control over your healing charges by going to Kiriko’s settings and turning toggle healing ofuda off. By doing so, you will have to hold your primary fire to consume more than one charge.

Similarly, you can switch the key binds of your primary and secondary fire. This allows you to throw kunai with mouse 1 instead of mouse 2, like in most FPS games, for a smoother aiming experience.
In the Season 2 update, devs added a setting allowing you to climb walls automatically when moving toward them. This makes wall climbing feel more intuitive for players used to Genji’s and Hanzo’s wall climb mechanics.
What is Your Responsibility When Playing Kiriko Support?
Supports are not healers. This is an important distinction since healing in Overwatch isn’t enough in higher ranks. Supports might be the most challenging role to handle in this new meta. They must juggle several major responsibilities:
- Keeping your teammates alive (In most cases, your tank takes priority in this regard.)
- Enabling your allies to pop off (e.g., nading enemies with Ana, damage boosting DPS with Mercy)
- Protecting themselves from enemy pressure (If you die, your teammates die.)
- Making proactive plays themselves (Heroes, such as Kiriko, can and should deal lethal damage to increase their team’s pressure.)
Kiriko’s mobile, high-ceiling kit allows her to fulfill all these goals:
- Heal and use your Protection Suzu to keep your allies alive.
- Give buffs to your team with your Kitsune Rush
- Use your kunai, Swift Step, and Protection Suzu to survive enemy pressure.
- Gain positional advantages with your Wall Climb and Swift Step and deal damage with your kunai.
When to Heal and When to Deal Damage?
As explained, you want to contribute to your team’s overall damage and eliminate squishy targets with your kunai. But you don’t want to do that at the cost of your team’s survival. So, when should you heal, and when should you deal damage? Unfortunately, the answer isn’t clear-cut. Instead, your decision depends on situational factors unique to every team fight. That’s why practice and gameplay experience are crucial to honing your decision-making with Kiriko. However, I can give you a good starting point if you’re entirely new to Kiriko. In your first Kiriko matches, focus on healing only. After a while, you’ll naturally notice windows of opportunity where dealing damage is the better choice. These include:
- Spamming kunai toward choke points where you expect enemies to engage from
- Using kunai when all your team members are in full health
- Finishing off an enemy at low health
Final Thoughts
Congratulations if you’ve made it through this entire guide! I’ve included as much information as possible to give you an in-depth view of Kiriko. However, I know it’s impossible to cover everything, and insights change with meta updates. I recommend ML7’s YouTube channel for more Kiriko tips. Still, I hope you’re now inspired to grab your talismans and kunai and battle it out! Good luck with your matches!